Thursday, April 19, 2012

"Baloo"

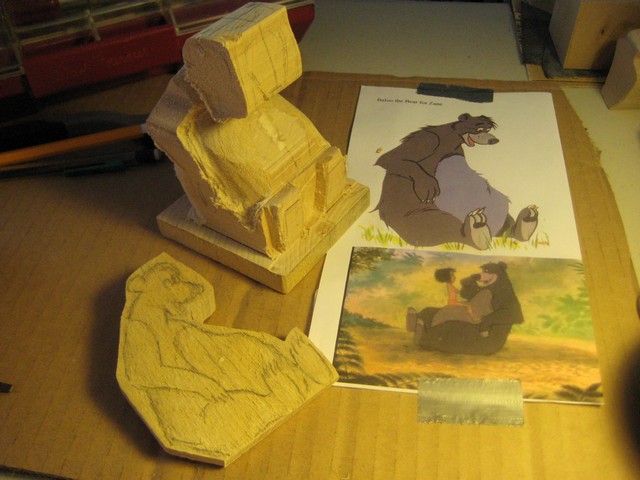
"Baloo the Bear" was fun to carve. The "roly-poly" shape of this lovable bear fits his character.
Thanks to "Baloo" I found out just how long a cheep band saw blade's teeth keep an edge. The blade dulled up after a handful of pieces. It's time to cough up the $$$ for a quality blade.
However, with perseverance and easing the piece against the blade I was able to complete all  the coping he needed.
This cuddly fellow never gave me any problems
Even though I realized he needed tufts of fur, for some reason I just pressed on and figured I do something later in the carving.

Well, I just kept on working... until I realized I didn't leave any wood for the "fur features!"
Now what?
He needs something on his head and back and maybe just a little something on his elbows.
Let's see, glue chunks of wood on those areas and reduce them. Naw, that didn't work. Hmmmmm,
slices of shaved wood chips? Maybe! He really needs something.
I know, toothpicks! (At least the fur on his head.)

He needs something on he upper back area. Let's try some wood shavings.
For his elbows, I simply reduced the thickness of his forearms.

I like it!

Now for the finishing touch....... color!

Tuesday, April 10, 2012

"Tigger"

Here's my latest piece, "Tigger."
This "happy go lucky" fellow started out on the band saw.
I'll let you know right up front, I coped out a little more than I should have. Notice "Tigger's" tail extending from his left arm? Look between his left knee and left paw...no tail!
That came to haunt me right from the start.
Now I've got to make his tail go straight up his back! Grrrrr!

He works up relatively quickly.
I decide on a the shape of his tail and position it (for strength) against his upper back.
He's looking pretty good, but...
His tail just ain't right! There's something about it. I run him by my wife and she politely tells me he looks more like a monkey. That did it! It's gotta go.
It's time for a little "surgery."

"Off with the tail!"
This time I'm going to make the tail as it is intended.
After some gluing and sanding "Tigger" is back on track.
Even "Tigger" looks happier!
Now to "finish" him off, it's time for some paint...
"Tigger" is the favorite Disney character of a friend who has a special place in his heart and home for him.

"Bouncing is what Tiggers do best."

Saturday, March 24, 2012

"Mickey Mouse... Ta Da"

Mickey worked up quickly, once I managed to get back to my carving desk! Between work, visitors and (admittedly) a touch of laziness thrown in it seemed like weeks passed by before I made any real progress with Mickey.

Mickey is the second piece I coped  with my band saw and boy what a time-saver it is.
You can almost see the little guy in the wood.
It also helps that your band saw is used specifically for wood carving and not those "everyday" projects that get in the way of your hobby.
And so we begin the process...

Paring down the soft basswood is easy but it sometimes makes it look like you're "chewing" the wood off rather than "carving."

Mickey's looking a lot thicker than the photo.
I figure he'd hold up better if I left a "little meat" on his arms and legs. As many wood carvers know, there are many people who feel the need to hold the piece rather than just look at it.
(Note: Please don't take offense by the above statement. Handling a piece that's taken many hours and lots of patience is much like holding a raw egg, there's a certain way to hold it without breaking it.)

Any way, on with our story.
Mickey begins to take shape. However right from the git-go I'm frustrated trying to make Mickey's muzzle and nose.
It looks like he's been "punched" in the nose!
I get to the point where I decide to "go-with-it."
I begin to clean and prep him for paint.

He's buffed, dusted and sealed for paint.
But I'm still miffed by his nose.
Oh well, here goes...
The paint comes out well but I run Mickey by my best critic, my wife.
"Everything is great....... but he has this, big pushed in nose."
That does it.
I prepped for "surgery!"
With surgeon like precision (enhanced for the story), I remove his nose and alter his muzzle.
Ah, soooooo much better!

Add a little clear and voila, here's Mickey!
Ta Da....
Ahhhhhhhh, I feel so much better!
(I'm sure Mickey does as well!)

Thursday, March 8, 2012

Donald Duck

Wow! First time using my new 10" band saw to cope out Donald and what a time saver.

Below, Donald is sketched and marked for coping.

Within minutes (what normally took me forty to forty-five minutes) I'm ready to take the Dremel to Donald.
I'm not new to using a band saw. I just never thought of using it for wood carving.

Once I had the sides cut I went for the front and back of Donald.

I was getting a little too confident with the band saw. Now that I've removed the front outline of Donald, I've got to pay close attention to the few remaining guidelines.

Donald worked up quickly.


The basic shape is there now just take my time and work out the details.


OK, Donald its time to bring you to life... it's time for some color!


You can squawk all you want Donald, I'll find a nice home for you!