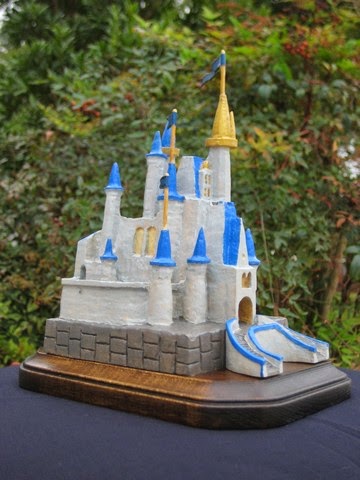
This will be a carving to remember. I wasn't prepared for the frustration involved with a carving. To boot, I put myself under a "deadline" to finish this piece. The recipient will be retiring from Disney and I decided to give him a carving on his last day at work. Between trying to work burrs deep into the piece and trying to complete this piece on time I'm glad to have been able to actually complete this piece at all, let alone on time!
The idea of the Castle came from a fellow Cast Member at work, Kambria. She recalls Marvin's managerial connection to Disney World's Cinderella's Castle which is one of his proudest and most
enjoyable time of his Disney career.
The actual Castle is extremely detailed and delicate for my style of wood carving so Kambria suggested the more stylized rendition of Cinderella's Castle. The Castle's logo.
Simple.... so I thought!
First the "roughing out" stage. As much of the bulk is removed with a band saw.
The few towers in the Logo turned out to be a bit more challenging than at first thought. A number of them are set back which means planning the location for them in the bulk of the piece. At first I was going to carve a relief carving. That meant that I'd only have to "define" the towers rather than plan much differently for the depth of the carving. Well, the piece quickly morphed into a little more than I was expecting... a 3D castle was immerging!
The back "wall" of the piece began to be reduced in size.
I know, I can save myself some time by making "trees" behind the castle.
I attacked the "trees" and tried going " freehand sans any tree definition lines.....
Right, that worked! Off with the "trees!"
Now I have to fabricate the rear of the Castle. I struggled with all kinds of crazy ideas so I didn't have to get into too much detail. There are lots of windows on the rear of the actual castle so I thought it best to stay clear of that. As it turns out the day I was ready to seal and paint the piece it dawned on me that a simple second story patio with a curved enclosure would have much closer (and easier than I had first thought) to the real thing.
Oh well, its done!
The frustration came from trying to "smooth" out the tower walls working with burrs that do not lend themselves to making flat surfaces on vertical recessed walls.
I refined the surfaces to a point, then just gave in and went for the "rustic" look!
I sacrificed detail and accuracy for "uniqueness."
After all, it will be a "One of A Kind Wood Carving!"
I added a staircase in the front of the Castle to draw your eyes to the front of the Castle.
Finally, its ready for paint and on time!
The finished product from a 4" X 4" X 12" block of tupelo wood.
The piece stands 6 3/4" tall from the surface of the mounting plaque to the tip of the highest flag pole.


