It's been months since I've been able to sit at my carving bench! But I'm back to it in a big way. My latest piece is for a friend and mentor for me in my new role at Disney World. Tim is a true "Car Guy" in every sense of the word. Which made my decision to carve "The Man and His Machine" an easy one. Tim has always had some sort of a "hobby" car over the years. His latest is a '66 Mustang.
Here's the story of "The Man and His Machine."
A block of 4" X 4" X 12" Tupelo wood is how this carving started out.


First, a little work on the band saw to outline the Mustang. A basic car is easy to cut out on the band saw but now comes the details that make a '66 Mustang different from other Mustangs.

I apprenticed as an Auto Body Repairman in the mid-sixties and "cut my teeth" on the early Mustangs. The subtle body contours are what I was striving to imitate. Things like "winglets" in the leading edge of the rear quarters and front and lower valance lights are the things I tried to reproduce so that only a guy like Tim would appreciate the tiny differences that make the "66 Mustang stand out.

The trick is to keep in mind that as you cut into the piece to make the shape you leave wood where you'll need it, i.e. door handles, light bezels, etc.
For example, the photo below shows that I've begun to cut into the sides of the quarter, door and fender for that distinctive early Mustang design. I noticed I didn't leave wood for the one body attachment that identifies the '66 Mustang. See what's missing?
The part is missing on the four photos below.


Then, it dawned on me that I forgot the bolted on three pointed "winglets" that fit into the recess of the leading edge of the quarter panels.
Luckily, the piece started out wide enough that I can continue to reduce the entire size of the vehicle to accommodate the feature.
(I worked on enough of these cars and I was pretty adept at replacing this part. How could I forget that!)

Working around cars all my life I have to add a couple of underbody car features so that when a real "car guy" looks under the carving he/she will see the engine oil pan and differential. So I added just enough to satisfy the automotive purist! The one thing I knew Tim would be looking for were the exhaust "tips" on the exhaust pipes. Tim just added new down turn tips on his car so I had to "personalize" this carving just a little more.

The grill, front and rear of the Mustang were somewhat tedious for me. Carving with a power tool is great but sometimes I get more than just a little frustrated when trying to make clean edges... but I'm working on this issue.


This carving will be the largest of my carvings since 2009 and it will also be a double carving piece. I'll add "Tim" to the piece.


"Tim" will be standing next to the car with his arm/hand resting on the roof.

I reduced the wood around "Tim's" neck prematurely. That meant that it caused me to make him taller than he should be standing next to his car. Actually, seeing that Tim is truly "larger than life" as a Disney Cast Member, I had no problem letting "Tim" be just a tad out of prospective!
Another thing I've learned is that I know my limitations as an artist. I figured out that I'll never be able to recreate an exact likeness of a person so I compensate by making the best of a specific feature that allows you to "see" just who the person or piece is. In Tim's case it's his hair. He never knew I paid close attention to his hair style and hair color. I came pretty close. I used the "sun glasses" as another trick because faces frustrate me!

The base is just a piece of pine that worked out well to give me the "track" and "finish line" to place "Tim" next to his Mustang. In the above photo you see that I've left a "base" under his feet. The "base" will be coped out to inlay "Tim" to the "Track."
You can also see the screw holes that will be used to hold the "Mustang" to the track.
I didn't use any "scientific" method to position the two pieces onto the track. As you can see I simply set the car (in the above photo) on pieces of 1/2" plywood so I can "guesstimate" the position of "Tim" to the car.

Tim and I joked about this but he had to pick metallic silver as one of the colors of his car.
(Tim and his friend Vinny picked the colors and developed the color scheme for his Mustang.)
I'm sure those of you who brush on metallic paints understand the issue I had with the sides of this piece. Metallic paints just don't cover well!
I wish that was the only problem I had painting the Mustang. I also had to deal with terrible grain swelling with the piece. In fact, it became such a bad problem I ended up completely sanding the silver off below the black and re-sanding the wood. Realizing I was going to be in the same position with trying to get the metallic silver to cover, it might help to use a "base coat" to help allow the silver to cover easier. Voila, a coating of light gray did the trick.
The next thing that Tim did to the color of his Mustang was to bring out the contrast of silver and black was to add a red pin stripe down the length of the car. With a suggestion from a Disney artist, I used masking tape to create the pin stripe. That did the job!

Now to put the pieces all together. The "Track" checker board was a last minute touch.

"The Man and His Machine"

The Headlights, lower front and rear lights glow in the dark!
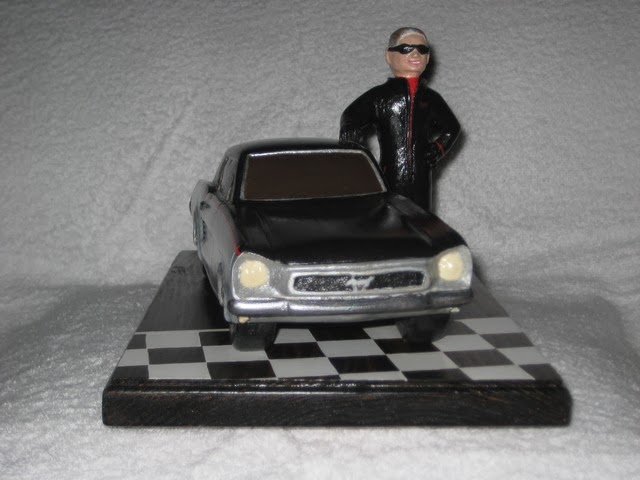


Tim is enjoying a life long career as a Disney Executive Host so it was only fitting to add a "Hidden Mickey" someplace on his "Mustang!"


