Thursday, December 22, 2011

"Francis the Ladybug"

The latest carving is "Francis the Ladybug" from the Disney movie "A Bugs Life." "Francis" is going home with a true Ladybug lover. I know he'll have a special place of honor and will never have to defend himself from any teasing from any bug again.
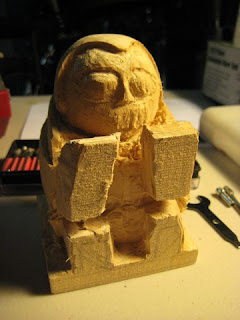
He started out in a solid piece of basswood.
I picked this picture because his arms and features were larger for carving ease.
I try to do a decent job of sketching the piece on the front and one side. Then, I use "guidelines" on the rear and side to identify my carving limits as I reduce the image throughout the "rough-out" stage.
Then its time to get carving.
I work to remove the excess wood for the entire image first.
I got to the above point and realized I didn't want to make his overall shape that much smaller. A few aspects of the carving made it difficult to keep his head and neck in prospective to his body if I reduced his body shell. So, I had to give thought to the base he was standing on.
I decided to remove the base and make his body shell more pronounced rather than "bury" it into the wood base.
I cut his base off. That meant I'd need to glue his feet to the base. I added a "tip" of a blade of grass.
Now, if I can pull this off, I can add more to the "story." (You'll understand when you see him completed.)
Now the finishing touches...

Then a face and antenna...

Now you have "Francis" standing on the tip of a blade of grass ready to fight for his honor!


Saturday, December 10, 2011

"Jeremy's Muppet Trio"

Back in the carving seat again and here is the latest piece. Jeremy just happens to be a "Muppet Officiando Extraordinaire." His favorite three Muppets are; Kermit, Gonzo and Scooter. I toyed with a number of ways to put the three of them into one carving and decided to go with just their heads all in one carving.
These little guys were going to be easy.... right!
You'd think that carving out three little simplistic heads would be simple to carve out. Until I started.
After a carving session I soon realized that working them is such close proximity to each other would make for some frustrating carving.
At a certain point of defining each carving things did get better, I just had to work each head in small steps to help me keep their prospective in relation to one another.
It all worked out. I managed to refrain from carving one or the other's cheek, ear or eyes off and make some great progress.
After "cleaning"the piece from burrs and dust they're finally ready for some color and their final clear coat.
...and there you have it!

Tuesday, November 29, 2011

"Winnie The Pooh"

"Winnie" is another Disney character who is well liked by a fellow Disney Cast Member. My carving gifts are given in appreciation for being good friends to my wife and I. One of the best things about giving a caving to someone is to find just the right subject to carve. Cast Members always have a favorite Disney character.
This "rolly-polly" character made for a fun carving.

Some coping here...

and a little more there.

Then its time to put the Dremel to work.


With the bulk removed and most of "Winnie" shaped its time to define him.


Some finish sanding and now its time for color.
Finally we can clear coat "Winnie" to bring out his true color.

Wednesday, November 23, 2011

"Dory"

The little blue fish, forgetful but loyal. Carving "Dory" was my wife's idea as a gift to her very close friend, Darlene. Of late we've noticed that Darlene has become a tad forgetful and my wife has lovingly "tagged" Darlene as "Dory." ..... and so we begin the "story" of "Dory."

"Dory" started out as usual, a block of wood. But, how was I to pose the little blue fish?
Oh well, I'll figure that out when I get there.

As she begins her transformation I plan to simply set her on a small pedestal.

Being my first "fish" carving I plan to keep her fins close to her body to reduce the chances of breaking them.

Above all I struggle with her eyes and mouth as those two features give her personality.

Decision time! I cut off her tiny pedestal and opt to give her a "sea bottom" scene.
(This too was my wife's idea.)

Once the sea plants were glued in most of the paint would need to be applied before I glued "Dory" in position.

I used a mixture of saw dust and wood glue as a filler for the transition between all three figures.
I inlay a short sea plant, a larger one and "Dory" in the roughed out "ocean floor."
The now thinned area where "Dory" is glued onto the base can easily break. "Dory" needed another contact point for additional strength.

The plan was to strengthen "Dory" with another glue point on her left side. Her left fin is "fitted" to the tall sea plant and glued.

... and voila!
Now that does it! But something just isn't right. I take a minute out to contemplate what to change and it dawns on me, its her smile (or lack of one).
I took a fine burr to her jaw to add more shape and what a difference.

Here's the finished "Dory."


Friday, November 4, 2011

Shillelagh and Mindy

"The Girls" as  their owner, Pam likes to call them. Mindy is the "instigator." Mindy, the pint-sized, tenacious and "Braveheart" of all dogs weighing in under five pounds seems no match for her 80+ pounds "sister." Yet, together the two of them compliment each other and are the love of their two owners, Pam and Lee.
Mindy routinely loves to antagonize Shillelagh. Looking at them you'd think they're the picture of peace and quiet. Well, you'd be wrong! Mindy thrives on "roughing" up Shillelagh by speeding around her and picking at her and taking advantage of size... until Shillelagh has had enough.
Lee says, when Shillelagh has had enough of Mindy's shenanigans Shillelagh bellows out a couple of warnings then grabs Mindy by the head and neck and with just enough squeeze, lets Mindy know... that's enough!
These two opposites are also uniquely inseparable.
This relief carving is in appreciation to Lee and Pam for all their kindness and friendship to us.

As the plaque progresses, I notice Mindy may be somewhat tougher to carve out due to her thin and fluffy hair around her face and ears.
I try to keep in mind relief carving is quite unlike three-dimensional carving in that working with a shallow piece of wood, the image is "fore-shortened." Basically, if you cut too deep too soon you quickly change the image aspect and you "flatten" the object.
The closer I got to the finish the more the wood grain frustrated me. The darker grain visually altered the depth and appearance in relation to the photos.
It was time to "put their faces on."
With a few more "touch-ups" it was time to seal them with clear finish and get them ready to be shipped to their new owners in time for Christmas!

Merry Christmas Pam and Lee and thank you for all you've done for us!