Thursday, April 4, 2013

"The Horse's ...."

A funny thing happened at the office. When talking about a new carving project the idea to carve a horse came up. The friend I was talking with laughingly suggested a "Horse's _ _ _!" The idea stuck and here's the results of that conversation.
A slender piece of Basswood will do the trick.
With a minimal amount of band saw work the piece was ready for carving.
I planned to carve the tail as well.
At this point I just happened to be talking to my brother-in-law and sister-in-law, Bill and Angela about using either doll hair or something similar. They suggested why not use real horse hair!
That was perfect! They contacted their longtime friend, Rachel in North Carolina and a couple days later I received an envelope with a hunk of horse hair in it.
I'd like to thank Bill and Angela for the idea and Rachel for "sacrificing" her horse's tail.
 
Now, the carving took on a whole new meaning.
I removed the wooden tail, whipped the end of a gathering of horse hair and glued them together.
The results made all the difference.
 
 
The "Horse's ..." recipient is a horse lover and rider and she loved the results.
 
And that's the end of this tale!


Friday, March 15, 2013

"Winnie the Pooh" (number 2)


Normally, I prefer not to carve a character twice. However, this "Winnie the Pooh" is going to be a gift from a friend of mine to a special person who just loves "Winnie the Pooh." The easiest way to avoid making the same character twice is to simply put it into another position. Seeing as how this person is very special to my friend I think I found a most appropriate position for "Winnie"
 
Let's start at the beginning...
 
First, the sketch and then we remove the bulk of the piece on the band saw.
 
Once the piece is "marked up" with the basic shape I can begin to "rough cut" the basic contours of the piece.
 
This is where you begin to "gamble" on just how much wood you think you should remove.
 
 
This "Winnie" left me with one very particularly perplexing problem; his muzzle!
I removed his muzzle to the eyes and cheeks. I glued a piece of wood to it and began remaking his muzzle.
 
Above, you can see the glue joint between his eyes and muzzle. However, I still had to reduce his nose and muzzle several more times before I was satisfied. (Of course, after he was painted I can see where I could have made it even better.)
 
 
Instead of mounting him on a cloud (as in the photo), he would be relaxing on a "grassy" surface.
After all, doesn't "Winnie" live in the woods!
 
Time for wood sealer and some color.


I'm sure "Winnie" will put a smile on his new owner's face!


Wednesday, January 9, 2013

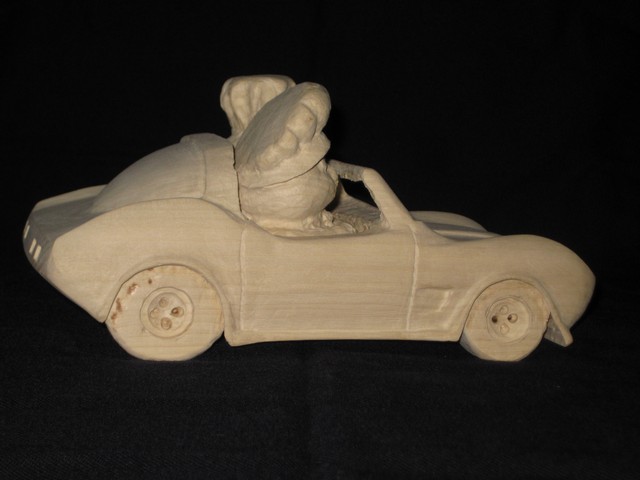
The Doughboy Kids and the Corvette

The idea of sitting the two "Doughboy Kids" in a Corvette developed while trying to think up a clever woodcarving gift for two of our close friends, Pam and Lee. They offer us camping space in their back yard when we travel north. Camping in their yard is not what you think. Pam and Lee own a construction company and he's basically set us up with a pad and full hook-ups.

Pam and Lee love following just about all types of car racing. They're especially fond of Super Modified Sprint Car racing. In fact, they just bought their own car to race! They hope to run the car this coming racing season.

Just last year, Lee purchased a '79 Corvette for he and Pam to "cruise" in.
 In addition to the 'Vette, Pam collects and has an awesome collection of Pillsbury Doughboys.  Now that you know how I deceided to put "Poppin' Fresh" and "Poppy" into the seats of a Corvette... here's the rest of the story...
Starting with a 4"X4"X12" piece of tupelo wood, the piece is sketched out.
The finished piece is 8"L X 4"W X 3 3/4"H

Then, a little time on the band saw.
Now the fun begins!

When I carve a piece I try to make the best of all the wood surfaces of the piece. The bottom of each piece is typically where I engrave the information about the piece. However, this piece being an automobile, I thought I'd add a few more "details" to it.

Now its time to carve to the finish!


It's time to add some color!


Finally, we can
 send the "Doughboy Kids" on the road to their new home with Pam and Lee!

Tuesday, November 20, 2012

"Cappi"

Just finished my first "commissioned" piece. Our good friends, Darlene and Buzz, have neighbors who recently lost their long time pet Cocker Spaniel and wanted to give them something very special. Knowing how much a pet means to a person she asked if I would carve a likeness of their pet "Cappi." I was humbled that she asked me to carve their pet but I am somewhat apprehensive because I carve "caricatures." Caricature carving gives a carver a great deal of "freedom of expression" and you don't have to "stay in the lines" (so to speak).

So with trepidation, I began "Cappi"....

I choose a photo of "Cappi" that required a larger piece of wood than my usual 3"X3"X12" basswood. I also changed the type of wood. Based on the suggestions of some friends on the Woodcarving Illustrated Forum, I purchased Tupelo wood that comes in 4"X4"X12" blocks. Tupelo wood is similar to basswood but finishes better for rotary tool carving.

Overall, the finished piece is 5 1/2" long, 41/2" high and just under 4" wide.

The new size fit well with the position I selected for "Cappi."
Now to reduce the excess wood.
Below, all the "cut offs" are slide to one side for emphasis.
Then, it's carving time...
Next we put him on a base.
As mentioned in an earlier post, I want to keep my carving set-up small. I don't have the space (nor do I want the expense of a full woodworking shop layout), so I make up a base the best way I can.
Below, "Cappi" will be glued into a flat piece of wood, then "Cappi" and his base are glued to another (fancier) base from Michael's (really inexpensive).
Above are the two sections of "Cappi's" base.
Add his name to the base....


...and now, to make him come alive (gulp)...
.
.
.
.
.
Here is the real "Cappi."
The real test is to see just how close I carved "Cappi" to the owners memory of him.
I'll be waiting to hear their reaction when Darlene and Buzz gives "Cappi" to his new owners!

Darlene did a great deal of undercover work for this piece. She had to get the photo (even a second one because I didn't have any real detail from the first photo). Then we had a question about the spelling of his name. She did an awesome job!

Receiving "Cappi" will be a total surprise to the owners, Bob and Linda.