//www.waltsapartment.com/disneyland-guides-they-have-a-dream-job/
"Minnie the Disneyette" is actually going to be given to a Disney Tour Guide. This carving worked up easily however, I focused on details that would be more meaningful for the recipient. Here in Disneyworld the Tour Guide costume colors are reversed from the costume of Disneyland. I had some guidance from Kambria who just happens to be the recipients daughter.
I thought I'd make short work of this piece because I wanted to make it smaller than the usual caricatures I carve. I used a piece of basswood for this carving. I've been slowly switching to tupelo wood for my carvings but I had a nice clear piece of basswood that was itchin' to be carved.
I found out once my burr started removing wood why I started carving tupelo. Basswood "fuzzes" up rather than making a clean surface as the wood is trimmed away.
That just meant I had to pay more attention to finish sanding and proper sealing to complete the piece.

Her silhouette was trimmed out easily on the band saw.

Now to remove the bulk and begin shaping her features.


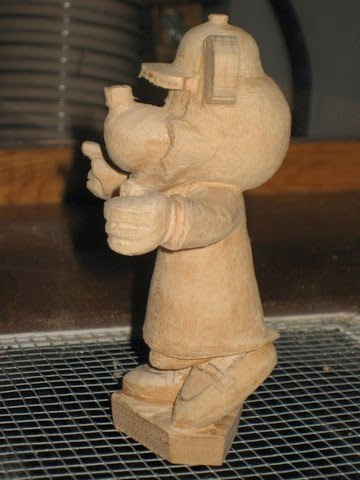
 After making a fair amount of dust, she's beginning to take shape.


Below she is sealed with MinWax 209 natural stain. Normally, the 209 is basically clear but it darkened the basswood quite a bit.
 After painting I realized I didn't reduce her muzzle and jaw enough. It changes her image drastically. Unfortunately, it wasn't until after she was painted that I noticed her facial appearance. While photographing her I came very close to taking her back to the carving bench for a "face lift!" However, as so many of you know, these pieces can take a lot of hours to carve... sometimes you just go with the way the piece evolves.


I found out once my burr started removing wood why I started carving tupelo. Basswood "fuzzes" up rather than making a clean surface as the wood is trimmed away.
That just meant I had to pay more attention to finish sanding and proper sealing to complete the piece.
"Minnie" is five inches tall without the base and just under three inches wide.
Her silhouette was trimmed out easily on the band saw.
Now to remove the bulk and begin shaping her features.
She required a great deal of finishing with fine burrs. "Minnie" has a bow on her hat and a name tag on her vest. I was making great progress and overlooked carving them as part of the figure. I added them as separate details which I like much better. They actually "stand" off the figure to make them look even better than if I had carved them as part of the figure.
I added a piece of toothpick to the back of the bow and bore out a hole for it in her hat.
The name tag was easier than I thought except I had to fabricate a tiny "peg" on the backside of the tag to glue it to her vest. Below, her bow and name tag are next to her left foot.
I like to inlay the caricatures to their bases.
Below she is sealed with MinWax 209 natural stain. Normally, the 209 is basically clear but it darkened the basswood quite a bit.
After I give "Minnie" to her new owner, we may discuss a possible surgical procedure!


